What is a PyPi Server and How to Set it Up Securely
Updated August 7, 2025

If your developers are part of the 15.7 million that use Python, you'll likely be familiar with PyPi (Python Package Index) servers. These repositories make distributing and installing Python packages a slightly less daunting task.
What is daunting, however, is that one-third of all PyPi servers are vulnerable to attacks. Their flawed design features were discovered and called out on GitHub in 2014. We've found this to hold true for any public-facing registries and repositories (such as NPM or Docker Hub), as malicious attackers see this as an easy target. Nine years later, these features continue to be exploited by attackers at record highs.
While there isn't a straightforward solution, workarounds make it much easier to avoid accidentally downloading malicious code into your packages. This article shares some best practices and a tutorial on securely setting up your private PyPi server.
PyPi server unpacked
PyPi serves as the default package repository for Python, providing a convenient way for developers to install and manage third-party libraries and applications quickly. Developers use PyPi to search for, download, and install Python packages using the pip package manager, which is integrated with PyPi. This repository contains over 350,000 open-source software packages covering various functionalities, including web development, data analysis, machine learning, and scientific computing.
PyPi server security risks
One of the critical features of PyPi that can make it dangerous is the ability to execute code automatically upon installation. One way that attackers can exploit this feature is by inserting malicious code into legitimate packages. For example, attackers can create packages that contain malware, viruses, or other malicious code that can be executed on the target system when the package is installed. These packages can be disguised as legitimate packages, making them difficult to detect and increasing the likelihood of being installed by unsuspecting users.
For example, Colorama vs. Colourama - the first is safe, but the latter contains malicious packages that hijack an infected user’s operating system clipboard. Every 500ms, it would scan for a Bitcoin-like address and then replace it with the attacker’s own Bitcoin address to hijack attempts of payments or transfers. The packages have since been removed from PyPi, but it doesn’t mean every package in the public system is safe.
Best security practices for working with a public PyPi Server
While these malicious packages are challenging to uncover, these tips will help you do your due diligence more effectively:
Examining Python packages
One of the critical best practices for using the public PyPI securely is to carefully examine Python packages before installing them. As noted, no package in PyPI comes with security guarantees. Users must scrutinize names, release histories, submission details, homepage links, and download numbers to ensure that packages are legitimate and free from malware or malicious code. Developers should also use package verification tools and other security measures to detect and prevent the installation of malicious packages.
Using the new wheel (.whl) file type
The new wheel (.whl) file type can be a valuable tool for preventing arbitrary code execution when installing Python packages from PyPi servers. Unlike other file types, such as .tar.gz or .zip, wheel files are designed to be platform-independent and contain pre-built binary files, meaning that they do not require code compilation during installation. This can help prevent the execution of arbitrary code during installation and reduce the risk of security vulnerabilities.
Additionally, wheel files can provide greater control and visibility over the installation process, as developers can inspect the file's contents and verify that it contains only the intended package and dependencies.
Downloading a package’s source code directly from its source control
Downloading a Python package through a browser can be an alternative way to install packages without relying on the setup.py process.You can do this by pointing your browser at https://pypi.org/project/, selecting either Download Files to download the current package version or Release History to select the version of your choice and then clicking on the package to save it to a location on your computer or network. This approach can be helpful for developers who want greater control over the installation process and want to minimize the risk of arbitrary code execution or other security vulnerabilities.
How to set up a private PyPi server securely
A private PyPi server can provide several benefits for a development team, such as improved security, faster and more reliable package downloads, easier package management, and more control over the development environment.
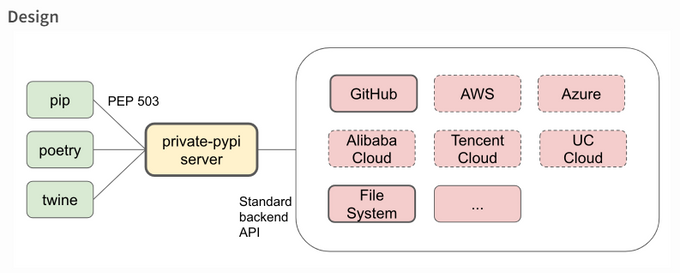
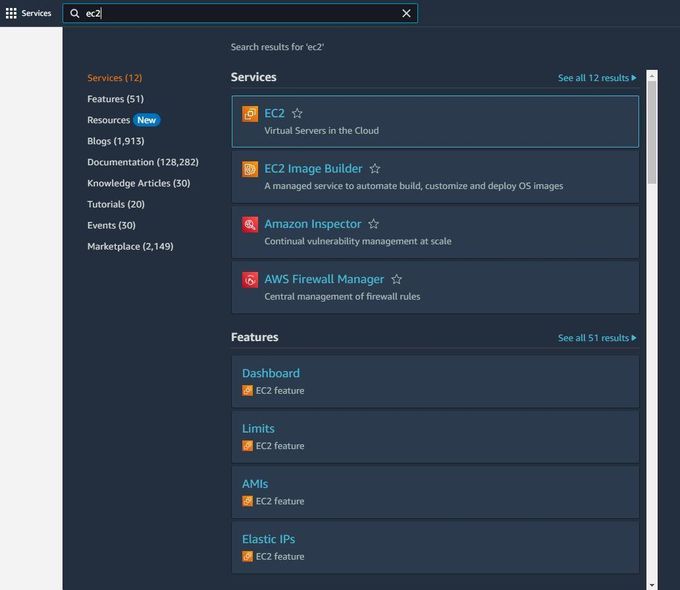
Private-pypi is a PyPI server that can be deployed privately. It keeps your artifacts secure by leveraging the power of your storage backend. To set up a private PyPI server using private-pypi on an EC2 instance, you'll first need to create an EC2 instance on AWS.
- Open the AWS Management Console and sign in to your account.
- Go to the EC2 Dashboard and click the "Launch Instance" button.
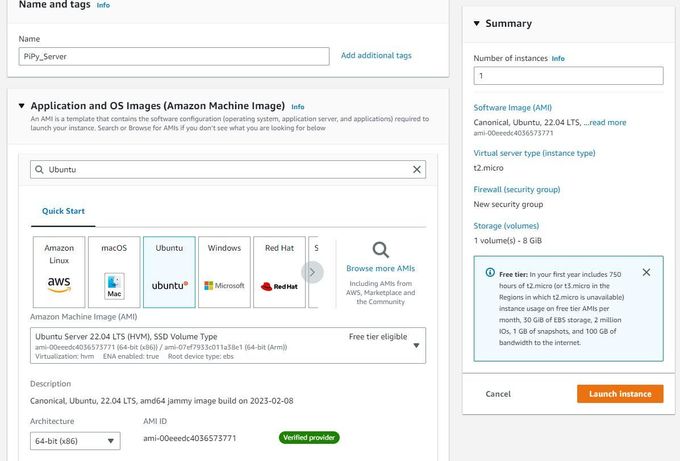
- Choose an Amazon Machine Image (AMI) for your instance (You can use the default Amazon Linux 2 AMI).
- Choose an instance type (The t2.micro instance type is usually sufficient for testing purposes).
- Configure the instance details (you can leave the default settings).
- Add storage to your instance (you can use the default settings here too).
- Add tags to your instance to help you identify it later on.
- Configure security group settings. Make sure to allow inbound traffic on port 8080 (or any other port you use for your private PyPI server).
- Review your instance details and launch the instance.
When your instance is running, you can connect to it using SSH. Once you have created your EC2 instance, you must configure it to set up your private PyPI server using
- Connect to your EC2 instance using SSH.
- Install Docker and Docker Compose on your instance. You can follow the official Docker documentation for this.
- Create a directory to store your private PyPI server data.
You can create this directory wherever you like on your EC2 instance, but we will use the directory "/opt/private-pypii" for this tutorial.
$ sudo mkdir /opt/private-pypi
- Create a configuration file for your private PyPI server.
You can use the example configuration file provided in the This tutorial will create a simple configuration file that uses the local file system backend.
$ sudo vi /opt/private-pypi/config.toml
Paste the following configuration into the file:
[local-file-system] type = "file_system" read_secret = "foo" write_secret = "bar"
This configuration tells You can replace these secrets with your own secrets. Remember not to hardcode any of your secrets into your repos if you upload images to your GitHub.
- Create an admin secrets file for your private PyPI server.
You can use the example admin secrets file provided in the This tutorial will create a simple admin secrets file that uses the local file system backend.
$ sudo vi /opt/private-pypi/admin_secret.toml
Paste the following configuration into the file:
[local-file-system] type = "file_system" raw = "foo"
This configuration tells You can replace this secret with your own secret.
- Start the
Create a file called docker-compose.yml in the same directory where you created the config.toml and admin_secret.toml files, and paste the following content:
services: private-pypi: image: privatepypi/private-pypi:0.2.0 volumes: - /opt/private-pypi:/private-pypi-root - /opt/private-pypi/config.toml:/config.toml - /opt/private-pypi/admin_secret.toml:/admin_secret.toml ports: - "8080:8080" environment: - PRIVATE_PYPI_CONFIG=/config.toml - PRIVATE_PYPI_ADMIN_SECRET=/admin_secret.toml
Save the file and run the following command to start the private-pypi server:
$ sudo docker-compose up -d
This will start the private-pypi server in detached mode. In your web browser, you can now access the
Now that you have set up your private PyPI server, you can upload your Python packages.
- To upload a package to your private PyPI server, use the twine command-line tool.
If you have not installed twine, you can install it using pip:
$ pip install twine
Once you have installed twine, navigate to the directory where your Python package is located and use the following command to upload it to your private PyPI server:
twine upload --repository-url http://<EC2 instance public IP>:8080/ --verbose dist/*
Replace
You should now be able to install your private Python packages using pip, just like any other Python package:
$ pip install --index-url http://<EC2 instance public IP>:8080/simple/ <package-name>
Replace
And that’s a wrap! You have successfully set up your own private PyPI server on an EC2 instance and uploaded a Python package. If you get stuck at any point, check out the official documentation to help you debug your specific issue.
Where to from here?
Using vulnerable packages can put your entire codebase at risk. By shifting security left in the development process, you can significantly reduce the likelihood of vulnerabilities finding their way into your code.
With Jit, you can leverage open-source security solutions to protect OSS packages, like those listed on PyPi but only for code that has changed, which doesn't turn security into something that slows you down. Start securing your PyPi server today with Jit.


![How to Use AWS Secrets Manager in the CLI [With Examples]](https://entail.jit.io/en-assets/jit/fit-in/280x280/Blog_Thumnail_10-1709638263339.png)


